
Welcome to my new website and blog!

Welcome, I hope you enjoy the new layout.
The site is now on the new platform that is much more maintainable. Sadly transferring everyone's comments and likes from the old database was proving to be too time-consuming so they will not be coming to the new platform.
Enjoy!
And please tell me what you think.
Visions of Data
We all know visualizations are an excellent way to summarize information, but some visualizations are better than others at condensing certain data. Sometimes dimensions don't map, data density doesn't represent well in the , and a bar chart is better than that line chart you wanted to make. This is because visualizations don’t just represent data, they also represent information’s context. And making sure the context comes across to the viewer is hard to do.
One part of context is the data’s continuity. There are three main types of continuity that data can have.
Discrete – These are values like Number of Bees. They have a set amount of accuracy and each value type is numbered, not named.
Classified– These are values like Gender or Nationality. These are also discrete, but the values are different enough have a name.
Continuous – These are values like Pressure or Time. They can be subdivided into infinitely small increments.
Now that we know we have these types and we know what they are, how do we coherently visualize them?

Let’s first look at bar charts and line charts. The height of each column in a bar chart can vary indefinitely. This means that the y-axis can be continuous, because there are no set ratios that the height any bar must be, charts have individual separated columns. This means that each bar must represent individual separate data points, making the horizontal axis good for discrete and categorical data.

Unlike bar charts, line charts have a line connecting individual data points and it has points with indefinitely varying vertical positions. The line implies continuity, so the x-axis and y-axis are good for continuous data.

Choose your visualizations carefully, it’s the difference between conveying understanding and being underwhelming.
Perks and Pitfalls of Self-describing APIs
Self describing APIs are a general method for describing or modeling of information that is implemented in applications and services. Popular ones such as OData and Resource Description Framework (RDF) use a variety of syntax notations and data serialization formats. As platforms bring data-oriented web APIs online, each platform is responsible for the design of their web API. They are confronted by the same kinds of questions, and each team answers these in their own particular way.
How do you expose the data, the relationships between the entities inside the data and what should the querying look like? Unfortunately, there are as many conflicting answers to these questions as there are RESTful web APIs.
Self describing APIs create standards that help solve this problem and we’ve created the best one yet. Our solution provides the following benefits:
A Simple and Uniform way of sharing data at the protocol level.
We Enable broad integration across products and breaks data silos.
All you need is Http stack to integrate with our data structure
Many people are shying away from Self describing APIs for reasons like the following:
They have already started on their software stack with its own API before anyone knew about Self describing APIs, so it was too late.
Self describing APIs support completely arbitrary queries of any type (it's basically raw-SQL-in-another-form), which they don’t want to allow on our production database. Send three or four monster bad queries through, and you could bring a production websites to their knees, interrupting service for everyone. That's why this arbitrary query stuff has ‘to be done in the cloud against the data dumps.’
I don't believe a one size fits all, generic API, specificity is actually a good strategy for a site of our size”. There's a reason people build custom software to better solve specific problems, rather than building everything on Sharepoint or Drupal or WordPress or whatever.
We can help mitigate these concerns. The Self Describing API we are building can fit on top of any setup with relative ease. Our query engine is resistant to overload. You don’t have to sacrifice targeted and nimble development for the power of standards.
We have a simple, uniform way of sharing data at the protocol level in a way that truly enables the lowest possible bar of entry, is key to enable broad integration across products and break data silos that form around applications.
Engineering a Website with Section 508 Compliance and Accessibility In Mind
All modern applications for the desktop, mobile, and web can be used with a screen reader, and knowing how to properly program an application with this in mind, is a valuable skill in today's world.
A screen reader is a software application that identifies and interprets what is displayed on the screen for use by the visually impaired. Or to put it another way, it transforms text to speech. Screen readers are now in all major operating systems (such as Apple Mac OSX, Microsoft Windows, and Linux) including mobile operating systems (such as iOS, Android, and Windows Mobile).
There are many types of screen readers including Text Screen Readers, GUI Screen Readers, and OS accessibility tools. Also, the accessibility API systems in operating systems are known as self-voicing applications. Many have screen readers specifically designed for browsers and web applications. When there is no direct text available but images of text or handwriting, there are optical character recognition (OCR) screen readers.
Two compliant standards affect how most websites are designed for screen reading technology. The one I am most familiar with is 508 compliance. This refers to the Section 508 Amendment to the Rehabilitation Act of 1963. The other standard is known as the Web Accessibility Initiative (WAI). It is part of the World Wide Web Consortium (W3Cs) WAI standard and is an effort to improve accessibility of the World Wide Web for people with disabilities.
Many states and all federal agencies’ technology stacks are required to be compliant with the Section 508 standards. But being in compliance does not mean that you have to meet all the technical standards. If it is too difficult or expensive to meet a standard, there are general exceptions. Exceptions such as difficulty meeting a National Security Agency standard or a NIST security standard can be granted, but in all other cases where implementation of the standard would not cause undue hardship to the federal agency or department involved, 508 compliance must be achieved.
The standard states that all information that can be accessed electronically must be available to people with disabilities. It is permissible if some users need certain software in order to access certain information, such as screen readers or display magnifiers.
Any web-based intranet or Internet applications must have accessibility to web content. For example, text descriptions for any visuals such that users with a disability or users that need assistive technology can access the content are required.
Now that you understand screen readers and the compliance standards, let‘s go over some compliance tips and tricks. This will help with designing a new, or modifying an existing, website to comply with these standards.
Software Aids
Almost all application-based screen readers work off the same principle: the application reads through the text on screen by linearly traversing, or iterating, through the text content, going from left to right and top to bottom, just like a user reading the document. When the screen reading application encounters a change in content, such as an AJAX call, on the page, the reader usually stops the current navigation through the content and the reader restarts reading the page after the change in page content is completed. This also can mean changes the user can’t see, such as the reader iterating through the page from HTML to hidden assets such as JavaScript and CSS embedded into the page or rich content such as audio, video, flash, or HTML canvas elements.
HTML Code
It is recommended to keep your HTML code grouped and in order on the page. I believe this is the most important design choice you must make when preparing for screen readers. One best practice is to make screen reading easier is to make sure you limit your use of headings, divs, and spans with CSS that moves them on the page. Another tip is to make sure to separate the content portions of your website according to type; such as JavaScript and CSS on the top of the page (preferably in a reference file) and HTML content in the body with rich content such as video, audio, or flash embedded in the body without much CSS.
AJAX
Almost all older screen reading technologies cannot handle AJAX (also known as Asynchronous JavaScript Calls or postback AJAX). AJAX causes the screen readers that integrate into web browsers to lose their place on the page and start over. When working with these screen readers, I have implemented a “508 Compliance Mode” that disables postbacks. Instead, when a change happens on the page, it simply refreshes the entire page to show the update.
Flash Content
When you want a website to have maximum accessibility with the least amount of complications, stay away from flash content. Many screen readers, and even iOS devices, do not support flash and the ones that do suck at dealing with complicated flash content. But if you must use flash, populate the data in the flash portions of your webpage using the technique called frontloading. This means that you write brief paragraphs of content and place them early in the action script, and in order, inside the flash content so that is easily viewable for the screenwriter. An easy way to test flash to see if you have good screen reader compliance is to check if you are able to highlight text, or copy and paste text from the flash element. If this is true, then most flash supporting screen readers will be able to access this content.
Written Content
When designing a webpage for accessibility, ensure that you add a summary paragraph of each page at the top of the page and summaries above large blocks of written content. This allows a disabled user to get a brief and quick understanding of what information is on the page, or what page does, and therefore will be able to make decisions on what to do and where to navigate. I believe this is a best practice in general because it has the same benefits to seeing users.
Headings
Make sure to use accurate descriptions of all headings and to use the proper types of header tags (e.g. <h1> … <h6>) so that the screen reader can understand where you are in relationship to the entire page. Most screen readers create hierarchal indexes of the header levels and title tags as a way to skip to different portions of the page.
Images and Links
When using images on your website or application, make sure to always include the “alt” attribute, an alternative descriptor, when embedding rich content. This “alt” text will allow the screen reader to describe to the user what the content contains. Also use this tag for links. Don’t put “click here” or “forward” or “next” in an “alt” or “tooltip” tag for a link, say what the link goes to, such as “Next Page: Step 9, Confirmation”; this will give much better guidance to the user.
I believe these practices and tips are a good start for creating web pages with accessibility in mind, but nothing replaces good user testing. Good Luck!
How to Optimize Your Site Using Visual Studio 2012
I am sorry, this article is no longer available.
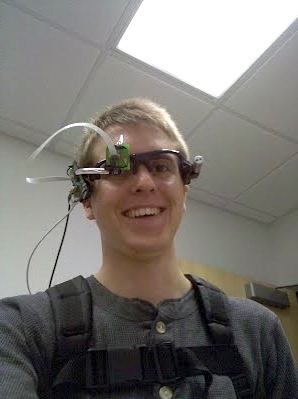
Controll Parrot AR drone with Emotiv Epoc

The Parrot AR drone is a new flying robot that has now development SDKs for all major platforms.
With the Emotive Epoc SDK, a preliminary flight remote server has been designed to run on Windows PC for interaction with any Web mobile device.
https://github.com/Ruslan-B/AR.Drone
Use the headset to control the Drone's flight while observing the Drone video on an iPod or iPad

If you are interested in this project and would like to know more, please contact me.
A. R. Drone Technical Details
Embedded computer system
ARM9 processor, 128MB RAM, Wi-Fi b/g, USB, Linux OS
Inertial guidance systems
3 axis accelerometer
2 axis gyro-meter
1 axis yaw precision gyro-meter
Specs:
Speed: 5m/s; 18km/h
Weight: Less than 1 pound
Flying time ~12 mins.
Ultrasound altimeter
Range: 6 meters – vertical stabilization
Camera
Vertical high speed camera: up to 60 fps – allows stabilization
Based on EEG, 14 sensors – positioned for accurate spatial resolution
Detecting facial expressions are very fast (<10ms)
Wireless chip is proprietary and operates on frequency 2.4GHz
Hacked to use via Python
https://github.com/daeken/Emokit/blob/master/Announcement.md
https://github.com/daeken/Emokit
http://dsc.discovery.com/videos/prototype-this-mind-controlled-car.html
http://www.autonomos.inf.fu-berlin.de/subprojects/braindriver
http://sensorlab.cs.dartmouth.edu/pubs/neurophone.pdf
http://www.engadget.com/2011/02/19/german-researchers-take-mind-controlled-car-for-a-carefully-cont/
Our goal is to control the A R Drone using thoughts via Emotive EPOC
Control the A.R. Drone using Computer
Get the commands from Emotiv EPOC and process those
Design an architecture to connect both and is extendable to incorporate multiple devices.
Establish connections and fine tune the data for smooth controlling
Map headset signals to reasonable commands
Create a channel between the commands from headset interface and A. R. Drone
client/server architecture
allows us to control multiple A. R. Drones remotely
programs can be extended to run on different environments
Emotiv
Connect
Emo Composer
Configurations
Server
Mappings
Emo Engine
Core
Emotiv
EPOC
CLIENT
(updates every 500ms)
Virtual
Input
Device
(updates every 20ms)
Win32
A R Drone
Controller
Buffer
Quad-copter
Emotive SDK is platform dependent
Headset sends many signals
States change very rapidly – causes noisy interstates
Training requires to focus and not interchangeable from person to person
There is no universal training method to get same results
Current System:
Enhance the system to connect with multiple clients
Enable the system to work remotely via Internet
Client could be made more intelligent in order to handle emergency situations
The technology could be used to control devices which we used in daily routine, like cars, phones, other electronics etc.
On long run the EEG devices could be improved to a level where controlling devices will become as natural as controlling once body parts.
We are able to fully control the A R Drone using earlier by facial expression and gyro-meter and later by only using the cognitive commands. Given time this system could be future enhanced to control multiple devices simultaneously with a higher accuracy.
The available technology for reading and processing the thoughts is pretty good to control a system with limited command set, but it needs a lot of improvement in order to be used for complex systems.
Great learning experience
Make the Creation of Aspose Documents easier
The Aspose.Pdf.Generator.Text class contains a property called IsHtmlTagSupportedwhich makes it possible to add HTML tags/contents into PDF files. The added content is rendered in native HTML tags instead of appearing as a simple text string. To support a similar feature in the new Document Object Model (DOM) of the Aspose.Pdf namespace, the HtmlFragment class has been introduced.
// Instantiate Document object
Document doc = new Document();
// Add a page to pages collection of PDF file
Page page = doc.Pages.Add();
// Instantiate HtmlFragment with HTML contnets
HtmlFragment titel = new HtmlFragment("<fontsize=10><b><i>Table</i></b></fontsize>");
// Set bottom margin information
titel.Margin.Bottom = 10;
// Set top margin information
titel.Margin.Top = 200;
// Add HTML Fragment to paragraphs collection of page
page.Paragraphs.Add(titel);
// Save PDF file
doc.Save("outputlpdf");
The steps below creates the Hello World application using the Aspose.Cells API:
- Create an instance of the [{{Workbook}}] class.
- If you have a license, then apply it.
If you are using the evaluation version, skip the license related code lines. - Create a new Excel file, or open an existing Excel file.
- Access any desired cell of a worksheet in the Excel file.
- Insert the words Hello World! into a cell accessed.
- Generate the modified Microsoft Excel file.
//Create a License object
License license = new License();

//Set the license of Aspose.Cells to avoid the evaluation
//limitations
license.SetLicense("Aspose.Cells.lic");

//Instantiate a Workbook object that represents Excel file.
Workbook wb = new Workbook();

//Note when you create a new workbook, a default worksheet
//"Sheet1" is added (by default) to the workbook.
//Access the first worksheet "Sheet1" in the book.
Worksheet sheet = wb.Worksheets[0];

//Access the "A1" cell in the sheet.
Cell cell = sheet.Cells["A1"];

//Input the "Hello World!" text into the "A1" cell
cell.PutValue("Hello World!");

//Save the Excel file.
wb.Save("d:\\MyBook.xls", SaveFormat.Excel97To2003);
Charts in WebGL
I am sorry, this article is no longer available.
http://jsfiddle.net/4N7jQ/1/
https://github.com/domitry/elegans
http://caniuse.com/#feat=webgl
Homebrew HD Antenna
http://en.wikipedia.org/wiki/Yagi-Uda_antenna
With the internet fulfilling all of my entertainment needs, I am too cheap for cable. Therefore I decided to make my own OTA HD antenna. After much research I decided to combine a fractal antenna design from Instrucables and a traditional Yagi-Uda antenna.
This is my first version, it's ugly, but it is super cheap.

Parts:
1 Ohm UHF/VHF Matching Transformer
4 Coat hangers (with or without plastic shielding)
1 plastic box
1 roll of metallic tape
2 ft. of aluminum foil
BONUS:
This was my first homebrew antenna built for a traditional OTA TV tuner. Works better than store bought antenna.
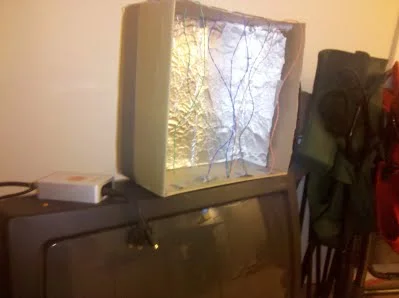
Parts:
1 USPS box
1 Aluminum foil
1 COAX Cable
1 CAT5 Cable with separated braided cable.
Point in the direction of signal. Connect exposed wire by twisting around core of the Coax Cable. No solder required.Picks up analog, digital, and open air HD signals.

RIT Senior Dinner at Liberty Hill
Liberty Hill Taxi

Barn Ballroom
Liberty Hill Barn and Silo

One room of the Liberty Hill Banjo Collection

Develop for the iPad on a PC
Own an iPad but not a Mac? Think you are left out of the development party? Think again. Grab a DVD of OSX Snow Leopard, Oracle VirtualBox 4, and Empire EFI 3 and dive in. Look online for EFI Boot, USB, and Sound drivers.

Set up the VM as a single core Mac Mini and enjoy.

Use Network Places and GL Display to get sync folders in the VM, hardware graphics, and GIT repository. Install Xcode 4 and mount iPhone or iPad directly to the VM.
You can now run applications on the iPhone simulator or Device of your choice.

One drawback, you cannot register the VM with Apple Developer Connections and use for Publishing to App Store.
Android and GO

Google Go is an amazing new language being developed by some of the top programmers in the world. Sadly, it has not gained as much traction as it deserves. I have crated a repository of Demo applications and and small site of resources for anyone interested in learning more.

Programming Skills for Google Go!
https://code.google.com/p/progskillsgo/
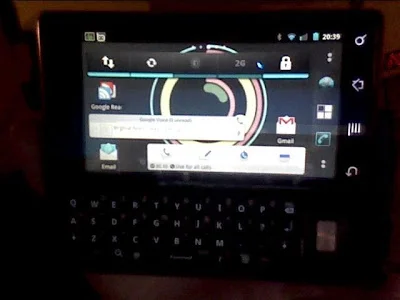
Recently there has been added support for the Android platform and web Server. Here is a screenshot of my fractal generator server running on my Motorola Droid with ARM 7 processor.
Demos:
All of my demos can be run on most devices after a quick build. Documentation can be generated from compiled source code. Requirements: The Google Go API and runtime must first be installed to run the demos. Go to golang.org for further information. Download: The code repository uses SVN and can be found Reading Links: If you would like to know more about related information, projects using Google Go, and programming tips, look at the reading links below.
Reading Links
3/12/10
The Go Programming Language Main Sitehttp://golang.org
Go Tutorialhttp://golang.org/doc/go_tutorial.html
Go Language Wikipedia pagehttp://en.wikipedia.org/wiki/Go_%28programming_language%29
3/15/10
Super Cool Go Talk
http://www.youtube.com/watch?v=rKnDgT73v8s
Go Course Pages
http://golang.org/doc/GoCourseDay1.pdf
http://golang.org/doc/GoCourseDay2.pdf
http://golang.org/doc/GoCourseDay3.pdf
3/22/10
Functional Programming Tutorial
http://www.freenetpages.co.uk/hp/alan.gauld/tutfctnl.htm
Go for C++ Programmers
http://golang.org/doc/go_for_cpp_programmers.html
3/29/10
Go Language resource center
http://go-lang.cat-v.org/
Go Blog
http://blog.golang.org/
4/5/10
Really good syntax highlighting
http://go-lang.cat-v.org/text-editors/
4/12/10
Matrix Addition
http://en.wikipedia.org/wiki/Matrix_addition
Matrix Multiplicationhttp://en.wikipedia.org/wiki/Matrix_multiplication
4/29/10
Go Language resource center
http://go-lang.cat-v.org/
Go Blog
http://blog.golang.org/
4/26/10
go-nuts google grouphttp://groups.google.com/group/golang-nuts
5/10/10
Robert Pike's talk: Another go at language design
http://www.stanford.edu/class/ee380/Abstracts/100428-pike-stanford.pdf
Chat client/server models
http://java-source.net/open-source/chat-servers
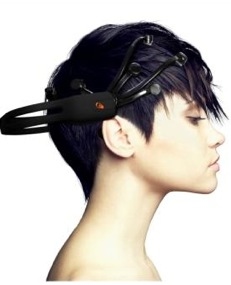
Mobile Eye Tracking Headset
Here's me as a participant and aid for the Mobile Eye Tracking User Study for the Multidisciplinary Vision Research Laboratory at RIT during the Test Drive phase of the research.

"Look dorky and prosper"
The camera in font of my right eye tracks eye movement and focus and the laser on the left side of my head calibrates display orientation when I look at a test image on the wall. A camera in the bridge of the glasses tracks what is directly in front of me.

"Take me to your leader"
All of the sensor data is fed through the two wires into the laptop mounted in the backpack. Software running on the laptop interprets visual information live, collects video and audio, and then stores the data for further study. The test is performed on a large sample of students by having them first calibrate the display and then walk a predetermined course.

This experiment was done as an early step in visual perception and augmented reality research.
Project SmokeSignal

SmokeSignal tracks events in time and space and stores that information in a simple and safe location.
Web sites and advertisers collect and use personal information about you to understand you habits and predict your actions. Isn't it time you leverage your own information?
With SmokeSignal, you can track your daily movements and actions using your cellphone and common online accounts. SmokeSignal tracks events by time and location and stores that information in a simple and safe place.
Getting Started:
Setting up SmokeSignal in three simple steps:
1. Install the SmokeSignal Database wherever you choose.
2. Connect your accounts to your SmokeSignal Database.
3. Connect you mobile phone or browser to SmokeSignal. Now you can view and collect your information.
What You Can Do:
Integrates with the Following Products and Accounts:


Maps
Use Google Maps, Google Earth, or MyTracks for Android to create personal maps of your locations and trips. Track your movement over time and find habits in your movements. Your daily commute, shopping trips, and visiting friends are all easily visible. Plan and track your vacation down to the second and inch. View and create color pins to tell how often you visit a location. Create and share symbols and heat maps to mark a specific type of location in your daily life.
Document Management
Use Optical Character Reader scanner technology to scan documents, receipts, records, mail, photos and more. Shrink the clutter of taxes, homework, office records, mail, and receipts. Use OCR software by Adobe Acrobat or Neat Co NeatDesk to create digitally readable spreadsheets and documents. SmokeSignal can take digitally readable documents and scan their content by date and time. Names, locations, and purchases can be automatically organized and added to SmokeSignal.


Project RayWorld
This is a revised post of the RayWorld project prototype. RayWorld is an iOS ray trace renderer based on Renderman Shaders. This project won 2nd in the Apple Student Design Showcase for it's implementation of Stereoscopic 3D rendering on the iPad.
This project is being updated to create a be compatible with iOS 5, iPhone, and the new iPad.
New features and a whole new scene interface is coming soon. Including:
- OpenGL scene creator with camera views, object library, color chooser, and .OBJ and .MXT import.
- Animation system creating both image and video export.
- Whole new rendering system with massive speed improvements.
- Mobile server that allows for render jobs.
Look for a new version soon and to see RayWorld again on the iTunes App Store!
Introduction
This project and given assignments explore Ray Tracing, Stereoscopic 3D Rendering, Motion Blur, and Procedural Shading.
Project Proposal
Project Summary:
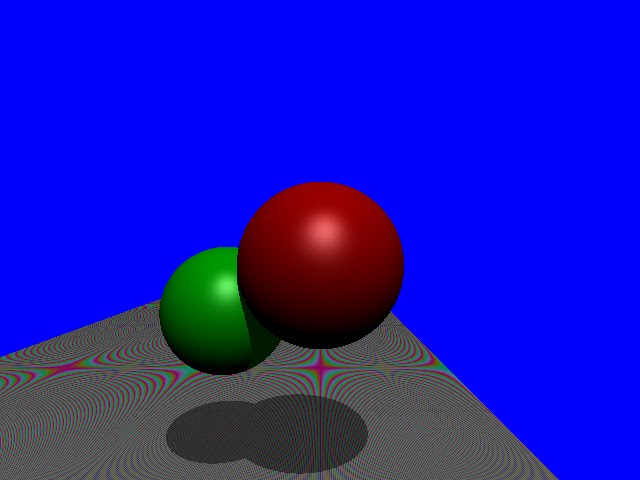
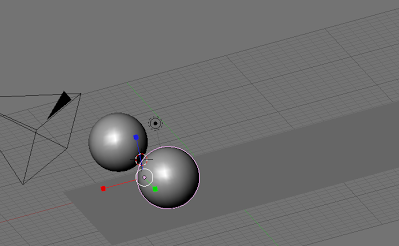
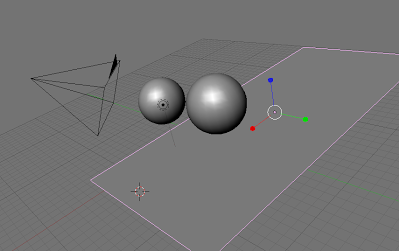
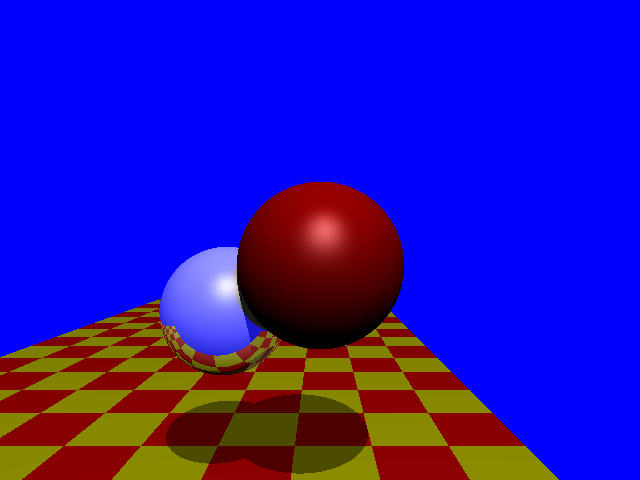
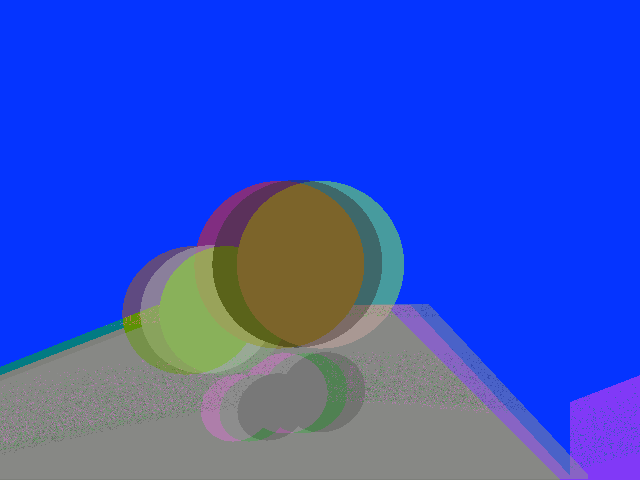
This project will explore building a 3D stereoscopic ray tracer capable of focus effects and can animate the frames rendered. This ray tracer will build a stereoscopic image using Anaglyph magenta-green channels. The animation rendered will feature the two spheres of the assigned ray tracer along with a polygon mesh model moving towards the camera view. This project will focus on building a 3D stereoscopic camera model and blending color channels in the tone reproduction stage of image synthesis.
Project Objectives:
Extend the assigned ray tracer to render stereoscopic image channels in the camera model.
Blend the stereoscopic image channels into one image using Anaglyph magenta-green channels.
Animate mesh objects in a scene and compile frames rendered by the ray tracer into a video.
Apply motion blur effects to the frames rendered.
This project will be written in C with the intention to eventually port the code to the iOS platform. Four Anaglyph magenta-green 3D glasses will be used to view the rendered animation. A set of synchronized 3D shutter glasses will be used for testing the 3D effect.
Project Components:
GUI
The program will take in command line arguments to define the properties of the rendering.
Coco Touch interface will have an initial options dialog to define these properties
Arguments:
Rendering mode
Channel colors
Channel spacing
Resolution of the animation
Length of the animation in time
Render mesh .obj file name
Ray Tracer
The standard ray tracer with recursive ray tracing and tone reproduction
Stereoscopic image channel renderer
Algorithm to blend stereoscopic image channels into an Anaglyph magenta-green image
Algorithm to apply motion blur effects to the frames rendered
Project Responsibilities:
Willliam Broza (Team Leader)
Build GUI
Create .obj file loader
Create Algorithm to blend stereoscopic image channels
Transform rendered frames into an animation
Testing
Virginia Allen (Project Manager)
Modify standard ray tracer to create Stereoscopic image channel renderings
Create Algorithm to apply motion blur effects
Integration of the project with Cocoa Touch
Testing
Final Presentation:
The final presentation will include evaluating details each stage of rendering as well as demonstrating the final 3D animation to the class. The group will cover the modifications made to the ray tracing code while evaluating each stage of the rendering. This will be done by displaying frames created from each stage. This will include images for each eye, color channels, animation, and motion blur. The final output will be demonstrated using a projector and the four Anaglyph magenta-green glasses.
How to Give Your Website a Facelift the Easy Way
I am sorry, this article is no longer available.
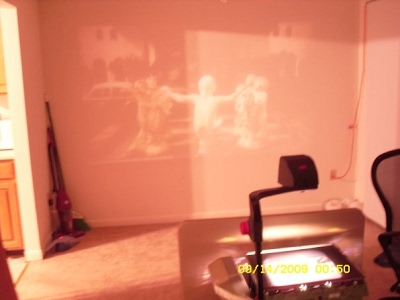
Build a 3D Projector for Cheap
Photosynth of finished setup
Light room with black lights so it does not disrupt image

The projection cover needs to be modified to let in more light from the Fresnel lens.
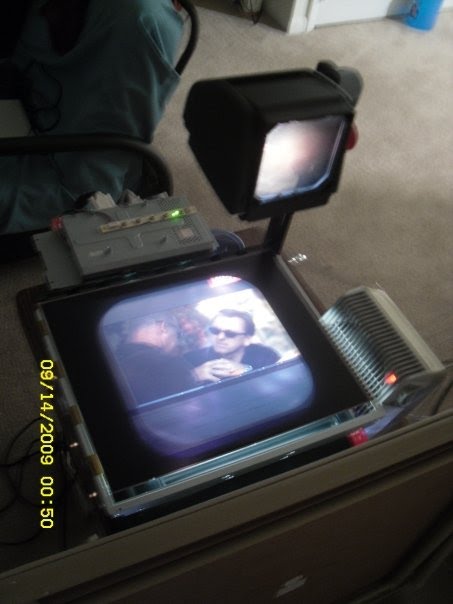
Hack the monitor apart and add cooling. I used a space heater fan

Find a nice big wall and sound system

A basic home theater is complete. But, can we go farther?

Create a Rear Projection Screen out of White plastic.
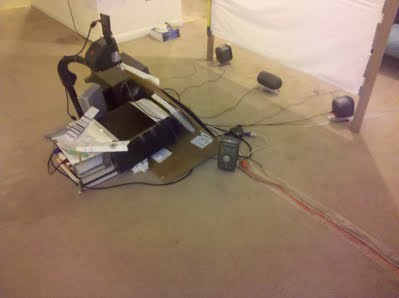
Add a HDMI 1080p Kodak Zi8 camera to the top of the projector.

Get raw video input from camera to PC.
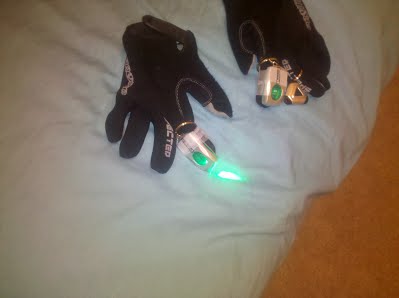
Use LED lights on gloves and track with camera using TriDef 3D
Scroll testing

Start with a VGA Dell monitor and a 3M overhead projector

Does not work well in daylight, yet.
Block direct light from projector bulb

Great for consoles, PC games, TV, and surfing the web.

Use wired shutter glasses with a PC for amazing images

Shutter glasses sync with the LCD display and give 3D effect to rendered scenes

Use "Pinch" LED light to simulate clicking
Experimental glasses for Anaglyph, Polarized, and Shutter 3D

Click test
Point select test
Android Hacking
Extend the functions of you Rooted Android Phone with Google Go API and CyanogenMod 7
Root and download CyanogenMod 7 to your device. Add GTron OTC Android Kernel 0.23.010110

This adds features like VNC, RDP, Wifi and USB Tether, VNC server, and Overclocking

Now you can dynamically generate web pages using Apache or Google Go and simple VPN routing.
Abacus & Slide Rule vs. Calculator
Modern technology or centuries old instruments. Which is faster, easier to use, more accurate, and more reliable? Lets test to find out.
Some classic slide rule, slide cylinder, and slide wheel designs.

Make a slide rule or slide wheel out of paper for free.
http://sliderulemuseum.com/SR_Scales.htm
Chinese Account abacuses are cheap to make or buy.
You can see the row of 1s called the "earth" above the row of 5s called "heaven".

An HP-15 Business Calculator. The longest made and best selling calculator of all time.

A classic american slide wheel from 1960.
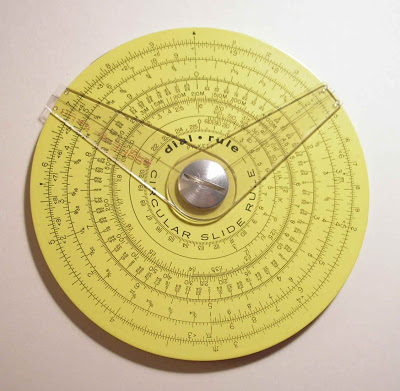
But who wins in an all out throw-down?
Results
| Device / Time | Abacus | Slide Rule | HP-15 Calculator |
| Addition | 1:01 | 11:05 | 0:14 |
| Percent | 1:20 | 2:55 | 0:49 |
| Log | 7:89 | 0:14 | 2:41 |
| Conversion | 25:39 | 12:54 | 21:09 |